Curing Cannabis Flower: The Complete Guide
Most growers put everything into the grow — the lighting, the nutrients, the genetics — and then rush the cure. That’s where quality gets left on the table. A proper cure is what separates good flower from great flower. It’s not complicated, but the details matter.
What’s Actually Happening Inside the Jar
Curing isn’t passive waiting. From the moment your dried buds hit a sealed jar, a series of enzymatic and chemical reactions kick off simultaneously. Chlorophyll — the compound responsible for that harsh green taste in fresh-dried cannabis — starts breaking down. The magnesium atom at the center of each chlorophyll molecule gets released as plant enzymes dismantle it. This takes time, and it cannot be rushed without killing the enzymes that do the work.
At the same time, residual sugars and starches inside the flower convert. Moisture redistributes from the dense inner stem tissue outward through the bud, equalizing across the whole structure. Terpene compounds — the aromatics that give each strain its distinct smell — shift and stabilize as the flower reaches chemical equilibrium. The result of all of this, given enough time, is smoother smoke, richer flavor, better aroma, and a more stable cannabinoid profile. That’s not marketing language. That’s what the science describes.
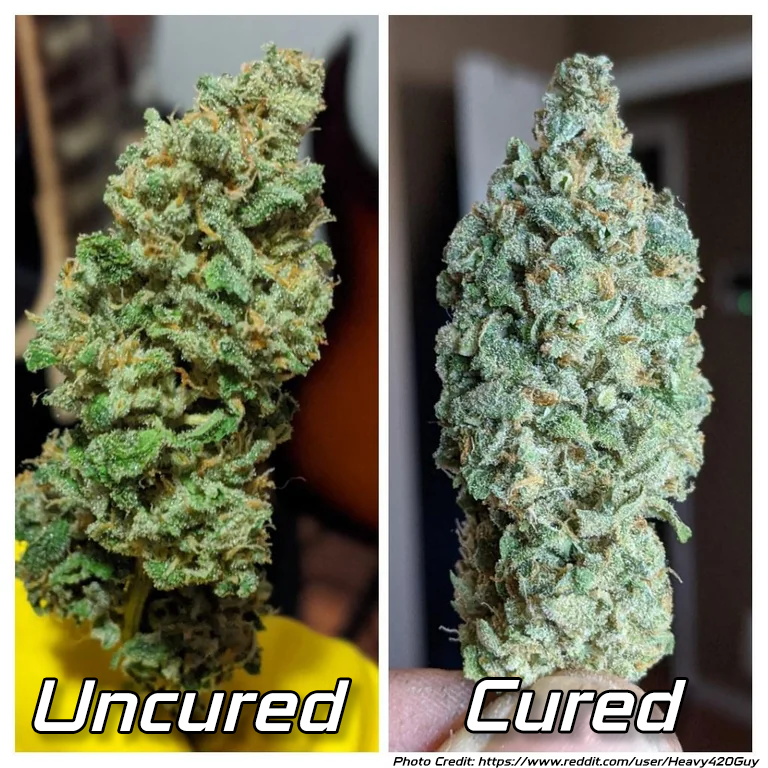
Why Curing Actually Matters
Fresh-cut cannabis is harsh, green-tasting, and nowhere near its potential. During the cure, chlorophyll breaks down, residual sugars and starches convert, and the terpene profile has time to fully develop. The result is smoother smoke, better flavor, stronger aroma, and improved potency. Skip or rush the cure and you’re smoking something that was never finished.
Wet Trim or Dry Trim First?
This comes up every harvest, so let’s settle it: dry trimming is better for quality. Leaving the sugar leaves on during the dry gives the bud a natural buffer — the leaves slow moisture loss, extend your drying window, and protect the trichomes on the bud surface while everything hangs. Wet trimming (cutting leaves off immediately after harvest) speeds the dry up, which usually works against you if you care about terpene preservation.
The exception is dense, indica-heavy genetics in a humid environment where mold pressure is high. In that case, removing some of the foliage makes sense. For most home growers, most of the time, dry trim wins. It’s stickier and more labor-intensive on trim day, but the end product justifies it. For a full breakdown of the drying process before you hit the jars, the drying guide here covers everything step by step.
Step 1 — The Dry
After harvest and trim, hang your branches upside down in a dark, cool, well-ventilated room. Get these numbers dialed in before anything goes in:
- Humidity: 60% RH. This is the target, not a range. Too low (below 55%) and the outside dries faster than the inside — you get a case-hardened bud that feels dry but holds moisture in the center, which leads to uneven curing and harsher smoke. Too high (above 65%) and you’re inviting mold.
- Temperature: 60–70°F (15–21°C). Cool and consistent. Warmer temps speed drying too fast and degrade terpenes. Fluctuations cause problems — more on that in a moment.
- Dark. UV light starts breaking down cannabinoids the moment it hits flower. Keep the drying space as dark as possible.
- Airflow — not wind. A small fan keeping the air moving is enough. You want circulation, not buds swaying in a breeze, which dries them unevenly.
Drying takes 7–14 days depending on bud density and your environment. The test: bend a smaller stem — if it snaps cleanly rather than folds, you’re ready to jar. The outside of the bud should feel dry to the touch, but there should still be a slight give when you squeeze. If they crunch, you’ve gone too far.
Step 2 — Into the Jars
64oz wide-mouth Ball mason jars are the standard for a reason. Glass is non-reactive, airtight, and doesn’t hold odor. Fill each jar about 70–75% full — the buds need some room. Pack them tight and you’ll get compression damage and uneven airflow inside the jar.
At this point, most guides will tell you to start burping. Open the jar twice a day, let the moisture out, repeat for weeks. That works. It also requires you to be consistent every single day, introduces uncontrolled air and ambient humidity every time you open the lid, and exposes your flower to whatever light is in the room. There’s a better method.
The Better Way — Vivi Packs + CureSleeves
The burpless cure isn’t a shortcut — it’s actually more precise than burping. The key is controlling the humidity inside the jar passively, so you never need to open it.
When your buds go into the jar, add a 62% RH Vivi pack. These two-way humidity control packs absorb excess moisture when the RH climbs too high and release it when it drops too low. They work constantly in the background, keeping the environment inside the jar stable at exactly the right level.
Days 1–10: Seal the jar with the pack inside and leave it alone. The pack is managing humidity actively during this period — this is when the most moisture equalization is happening. You do not need to open the jar. No burping. The pack handles everything.
After Day 10: Remove the pack. By this point the moisture in your buds has stabilized and equalized throughout. Seal the jar back up and continue the cure for another 2–3 weeks, still without opening. The flower is now curing in a sealed, stable environment — exactly the conditions that let terpenes develop and chlorophyll break down without interruption.
We strongly recommend picking up Vivi packs — they’re inexpensive, reusable, and genuinely change how you think about the cure.
Where CureSleeves Fit In
The Vivi pack takes care of humidity inside the jar. CureSleeves handle everything outside it.
Light protection. Even indirect ambient light degrades THC over time and accelerates terpene breakdown. A glass jar sitting in what looks like a dimly lit room is still collecting light exposure. CureSleeves are made from a neoprene material that blocks light completely — UV, visible spectrum, all of it. Once the sleeve is on, the buds inside are in the dark.
Temperature stability. Glass is a poor insulator. When room temperature fluctuates — from day to night, from AC cycling on and off, from a window nearby — the air inside the jar expands and contracts with it. That movement shifts the humidity level, which disrupts the cure and can cause inconsistent moisture distribution across your buds. The neoprene sleeve buffers those temperature swings significantly, keeping conditions inside the jar more stable between checks.
Together, a CureSleeve and a Vivi pack create a fully managed curing environment that requires almost no attention from you. The pack stabilizes the humidity. The sleeve keeps the temperature consistent and the light out. Your flower cures in ideal conditions from day one, without the daily ritual of opening and closing jars.
How Long Should You Cure?
There’s no hard cutoff — it depends on the strain, the density of your buds, and what you’re after. Here’s a reasonable framework:
- 3–4 weeks minimum. At this point the harshness is gone, the flavor is cleaner, and the smoke is noticeably smoother than it was fresh off the dry.
- 6–8 weeks is where most quality-focused growers land. The terpene profile is more complex, the aroma is stronger, and the overall experience is significantly better.
- 3–6 months for strains known for slow terpene development. Some cultivars genuinely open up at the 3-month mark in ways that are hard to believe compared to the 4-week version.
You’ll know the cure is finished when the smoke is smooth from the first inhale, the smell is rich and specific to the strain, and there’s no trace of that fresh-cut hay or grass note. That green taste is chlorophyll. It needs time to break down. Don’t rush it. For a deeper dive into what happens at each stage and how to know when you’ve peaked, the how long to cure weed guide breaks it down week by week.
Signs Your Cure Is On Track
Open a jar after 48 hours. It should smell noticeably different from when you jarred up — more moist, more pungent, possibly a faint ammonia note if moisture was slightly high. That’s normal. If you get a strong ammonia smell, the buds went in too wet and you need to air them out and slow the cure. A faint grassy or hay note at the two-week mark is also normal — chlorophyll breakdown isn’t complete yet. Give it time.
By week three or four, the jar smell should be shifting toward the strain’s actual terpene profile. You’ll start to smell what the plant is supposed to smell like — earthy, citrusy, gassy, piney, whatever the genetics produce. If you’re not getting there by week four, check your humidity. Too dry in the jar stalls the cure. A Vivi pack will prevent this from happening in the first place, but if you’re curing without one, this is the most common failure point.
Common Curing Mistakes
Jarring too early is the number one mistake. The outside of the bud can feel dry while the interior is still holding significant moisture. Put that in a sealed jar and you create conditions for mold or anaerobic bacteria, both of which ruin the batch. Use the stem snap test and don’t shortcut it.
Overdrying before the jar is the other extreme. If your buds crunch when you squeeze them, the moisture content has dropped too low for curing to work properly. There’s not enough water left for the enzymatic reactions to run. You can try rehydrating with a humidity pack, but the window for a great cure has mostly closed. Aim for buds that feel dry on the surface but give slightly when pressed.
Curing in plastic is a mistake you only make once. Plastic is gas-permeable — it lets terpenes escape slowly and can leach compounds into your flower over time. Plastic bags also build up static that strips trichomes off the surface. Glass mason jars are cheap, widely available, and actually do the job. Don’t compromise here.
Opening jars too frequently introduces humidity fluctuation, light exposure, and oxidation — all things that work against you over a long cure. If you’re using a Vivi pack, you have no reason to open the jar for the first two weeks. Trust the system you’ve set up and leave it alone.
Long-Term Storage
Once you’ve hit your target cure, store your jars sealed, in a cool dark space. A CureSleeve on each jar means you don’t need to worry about finding a perfectly light-proof cabinet — the sleeve has it covered. For anything you’re planning to store longer than 3 months, a small Vivi pack will keep the moisture right where you want it during storage as well.
Properly cured and stored cannabis holds its quality for well over a year. The work you put in during the cure directly determines how good it stays over time.
Frequently Asked Questions
How long does it take to cure cannabis?
A minimum of 3–4 weeks for functional results, but 6–8 weeks is where most growers see real quality improvements in smoothness, flavor, and aroma. Dense indica strains can benefit from cures of 3–6 months. The cure is done when the smoke is smooth, the smell is strain-specific, and the grassy hay note from chlorophyll is completely gone.
Do I have to burp my jars when curing?
No — not if you use two-way humidity control packs. Traditional burping exists to manage moisture and exchange air, both of which a quality pack like a Vivi handles passively inside a sealed jar. Drop one in at jar-up, seal the lid, and the pack maintains 62% RH throughout the cure without you manually intervening every day.
What humidity should I cure cannabis at?
62% relative humidity is the target. At this level, enzymatic activity continues normally — chlorophyll breaks down, terpenes stabilize, sugars convert — while staying too low for mold to establish. Two-way humidity packs calibrated to 62% are the most reliable way to maintain this passively without checking jars daily.
Can I cure cannabis in a plastic bag or container?
No. Plastic is gas-permeable — it lets terpenes escape slowly, can introduce off-flavors over time, and builds static that damages trichomes. Glass mason jars are the correct choice. They’re airtight, non-reactive, don’t hold odor, and are cheap enough that there’s no good reason to compromise.
Why does my cured cannabis still smell like hay?
A persistent hay or grass smell usually means one of two things: the buds dried too fast before jarring (common when drying temps are too high or humidity too low), or the cure hasn’t run long enough for chlorophyll to fully break down. If the dry conditions were good, give it more time — up to 4–6 weeks. If the hay smell is still present at week six, the damage most likely happened during the dry phase and can’t be fully recovered.
🌱 Ready to put this into practice?
Get the right gear for your grow.
Everything covered in this guide is supported by purpose-built accessories — designed for home growers who take their cure seriously.